We started the living room in October and have slowly been making progress. I hope to have AFTER PICTURES by end of February, but for now, here's some "in progress" photos.
OVERVIEW
of BEFORE REMODEL:

Dark wood paneling, dated carpet, oversized fireplace...

...damaged ceiling. Notice the tape by the ceiling trim on the fireplace? This tape is covering a crack in the ceiling.
FIRE PLACE~

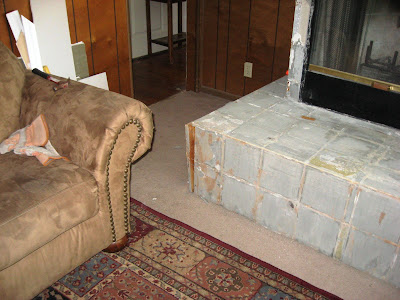
The "monster hearth" as we referred to it, is too big for the space. The living room is small (11'2" x 17') and this hearth doesn't make sense in front of this door way.
 The monster hearth has to go! With our furniture in place, it's a tight squeeze to get through this walk way space.
 Demo time!!! Joe loves to help demo!


As we took the fireplace out, our original intentions were to drop the existing firebox to the floor. As we took the fireplace apart, we discovered that the existing firebox was cracked in three places with a small hole on the back side.

The hole on the backside of the firebox created a burn mark (hot spot) on the drywall behind it. SCARY for the previous owners and for us with the high risk of a fire starting; we hadn't built a fire since we'd moved in, so we are thankful nothing bad happened.
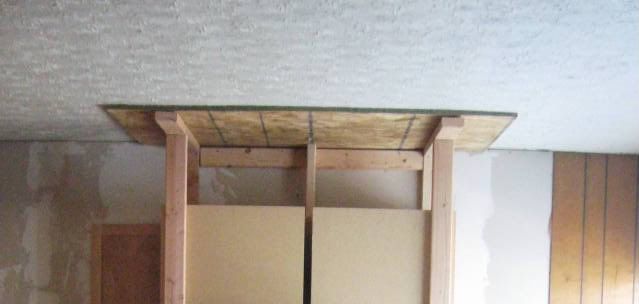
 After considering our options, we decided to get rid of the "real" fireplace. We covered the hole and damaged ceiling with a reinforcement piece of plywood with the plan to create a new unit that would serve as much needed entertainment storage, a "faux" fireplace, more lighting, a focal point for the room and a backdrop for our flat screen TV.
 I (Teri) designed the plan and built the framing while everyone was at school and work. Notice the duck tape? Since I was working the framing project by myself, DUCK TAPE was my extra pair of hands. In the photo above, the tape is holding the 2 x 4 so I can screw my other corner piece to complete the soffit.
 What a beautiful frame job! Kirk did the electrical on this job, adding another circuit to the breaker to accommodate the extra lights (in the soffit) and additional outlets.
 We installed the dry wall together, I did the mud and texturing, and Kirk did the painting... WHAT A TEAM we are!!!
 No longer a "fire place", I have created a "candle place". No more "monster hearth"... you can see how far it had come out (where the wood floor shows) compared to where we have it now. Also included, an electrical outlet inside the "candle place" to plug in a string of lights during holidays or when ever.

I love to tile!!! Kirk and I had a hard time agreeing on how we wanted to finish our fireplace. We ended up deciding on slate- a natural stone that will add balance to the room and be a smaller scale tile than what was previously there. (I'll post AFTER pictures later!)
ELECTRICAL & LIGHTING ISSUES~

Three light switches by the front door; one goes to the front porch light, one goes to the dining room light, and the middle was a "mysterious" switch that we could not determine what it went to (it had live wires going to it). Notice the OLD wiring that is frayed out in places?

We got ALL NEW wiring!!! And the middle light switch, now goes to our two new ceiling can lights. Beautiful!

And God said, "Let there be light".


Two soffit lights on each side around the "candle place"... they are on a dimmer switch that make it real nice for the times when we're watching TV and don't want bright lights, but have them on as mood lights.
INSULATION~

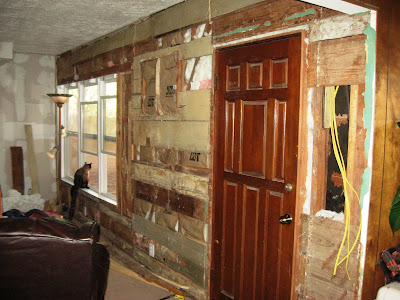
This wall had no insulation. I pulled down dry wall and everyother board to fit in R13 Insulation. As we do each room of our fixer upper, adding insulation has been a priority.

CEILING~

...time to replace? YEP!

Hummmm? why is that tape there?

As we took the fireplace apart, we discovered the "gaping crack" that was taped at the top of the fireplace; that's o.k., we can fix it...

A nice, sturdy piece of plywood screwed securely in the ceiling studs fixes our ceiling issues and creates a nice guide for the soffit framing.

I continue to be amazed at what a new coat of fresh paint can do!


 The monster hearth has to go! With our furniture in place, it's a tight squeeze to get through this walk way space.
 Demo time!!! Joe loves to help demo!


 As we took the fireplace out, our original intentions were to drop the existing firebox to the floor. As we took the fireplace apart, we discovered that the existing firebox was cracked in three places with a small hole on the back side.
 The hole on the backside of the firebox created a burn mark (hot spot) on the drywall behind it. SCARY for the previous owners and for us with the high risk of a fire starting; we hadn't built a fire since we'd moved in, so we are thankful nothing bad happened.
  After considering our options, we decided to get rid of the "real" fireplace. We covered the hole and damaged ceiling with a reinforcement piece of plywood with the plan to create a new unit that would serve as much needed entertainment storage, a "faux" fireplace, more lighting, a focal point for the room and a backdrop for our flat screen TV.
  I (Teri) designed the plan and built the framing while everyone was at school and work. Notice the duck tape? Since I was working the framing project by myself, DUCK TAPE was my extra pair of hands. In the photo above, the tape is holding the 2 x 4 so I can screw my other corner piece to complete the soffit.
 What a beautiful frame job! Kirk did the electrical on this job, adding another circuit to the breaker to accommodate the extra lights (in the soffit) and additional outlets.
  We installed the dry wall together, I did the mud and texturing, and Kirk did the painting... WHAT A TEAM we are!!!
 No longer a "fire place", I have created a "candle place". No more "monster hearth"... you can see how far it had come out (where the wood floor shows) compared to where we have it now. Also included, an electrical outlet inside the "candle place" to plug in a string of lights during holidays or when ever.
 I love to tile!!! Kirk and I had a hard time agreeing on how we wanted to finish our fireplace. We ended up deciding on slate- a natural stone that will add balance to the room and be a smaller scale tile than what was previously there. (I'll post AFTER pictures later!)
 Three light switches by the front door; one goes to the front porch light, one goes to the dining room light, and the middle was a "mysterious" switch that we could not determine what it went to (it had live wires going to it). Notice the OLD wiring that is frayed out in places?
 And God said, "Let there be light".
 Two soffit lights on each side around the "candle place"... they are on a dimmer switch that make it real nice for the times when we're watching TV and don't want bright lights, but have them on as mood lights.
 This wall had no insulation. I pulled down dry wall and everyother board to fit in R13 Insulation. As we do each room of our fixer upper, adding insulation has been a priority.
 ...time to replace? YEP!
 Hummmm? why is that tape there?

 I continue to be amazed at what a new coat of fresh paint can do!

