

We officially started our Bathroom #2 renovation the first week of September while the kids were on a break from school. We had this vision that we'd start and finish in a couple weeks. HA HA! Just like ALL the other rooms in our home, we discovered there's much more to the updates than we realized once we started, and the length of time it would take would be much longer than we expected.
Check it out~ (forgive me for so many pictures; I'm a "visual" learner and communicator and believe they speak volumes).


The kids picked out the "cool" shade of blue on the wall~ "Aqua Ice" by Kilz
The mirror has a recessed cabinet in the wall.
 This is a close up of the corner of the floor by the bathtub that had rotted. What you can't tell by the photo is the corner space is stuffed with steel wool and is about 1" x 2" . When the steel wool is pulled out, you're able to look straight to the ground.
 This original built-in cabinet had five layers of different colors of paint from over the many years of it's life (I sanded a small section to investigate). Since the layers of paint most likely contains some lead, we chose to repaint! The piece went from an antique cream color...
 ...love all the storage space. The bottom cupboard space was originally a wood hamper (the smelled musty and not practical). We converted the old hamper to a storage for toilet paper and cleaner- salvaged the original front of the hamper and added a hinge.


 ...I love stained glass! This window adds some nice light to the bathroom.
...the molding around the ceiling dress up the space as well.
...the mosaic border is our personal touch to accent and compliment the window.
 We saw the mosaic border idea at our Home Depot for $10.00 a 12" section. There was no way I wanted to spend that kind of money since we needed 22 sections, so we made our own for about $.50 a section using tile "left overs" from Bathroom #1 and this project. We saved over $200. as DIY'ers and got to make it more special with handpicked colors. Making the mosaic sections was a family project with the kids each doing at least one section piece (12" long)- Jessie did 3 or 4 sections!
 Soap and razor niche.
  No more arguing over where the shampoo belongs!
 Jessie and Joe are the first to initiate the new bathtub. Both in swimsuits, they think it's a fun place to play!
 This chunk of wall with tile on it came down in one big piece and scared Joe as it was falling. We were blessed he wasn't hurt.


 ...the tile backer board that was used (many, many years ago) was 1/2" plywood. After years of leaking around the broken chalking seal, the plywood rotted and crumbled around the bathtub upon touch.
 Joe having a grand time lifting the brittle laminate tile pieces off the floor...
 ..and a rat snake in the wall by the tub! FREAK OUT TIME! We never caught him since he was so fast to escape straight up the wall into a crack next to some plumbing that goes to the attic! YES, HE MAY STILL BE IN THE ATTIC SOMEWHERE! But, that's a good thing, since rat snakes are non-venomous and eat rodents!

 ...notice the opening above the shower area? (an opening for a transom window to let light in this room with no other windows!)
... how about the new tub? (we went from a 14" depth to an 18 " soaker tub depth)
...notice the niches near where the shower nozzle goes? (a place for soaps and razors- another is on the opposite side for the kids' shampoos- photo below)
...notice the shelf along the back wall? (perfect for kids to line their toys up, or candles for a nice bubble bath) ...the opposite side- four separate "cubby niches" for the kids to put their shampoos; each child has their own space!
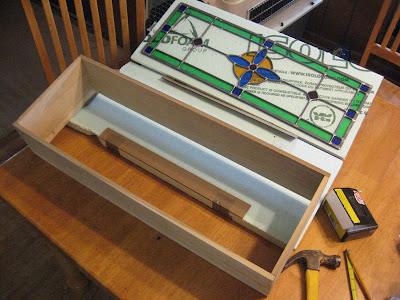
(ordered from eBay- an artist in Canada) Getting it installed was a challenge, but well worth it! The other side of the window faces the laundry room; we changed out the laundry room back door to an exterior door that has a window on the top half to let natural light in the space (which also comes into the stained glass window in addition to the ceiling light from the laundry room).


5 comments:
Nice! Great job there Sista'! Love the snake in the wall....NOT! BTW, nice color in the bathroom...and trust me I am honest about color!
What nice work! Your selections are great and the quality of your work is wonderful. Great job! I hope you feel good about your work...you should!
LOVE IT! I've checked out some of your pics on FB! You all have been very busy - great to see the kids involved too!
What a transformation! Wishing you could come to my house and help me!
Teri, this is incredible! Hopefully it won't be 10 more months of work for the other 6 rooms to be finished :) It's so fun how you've given the kids areas they can help in, too. What an exciting year you've had!
love,
Audrey
Post a Comment