Saturday, February 18, 2012

Kitchen Renovation~
BEFORE and AFTER

This was a big project (as they all seem to turn out to be). We got the bulk of the work done in about 5 weeks where we were displaced from using the space for that time. At the 5 week point we had finished the floors and installed the cabinets, leaving the counter tops to be installed and the detail work to be completed (like crown molding, floor and door trim, etc.).

We started our Kitchen Renovation in July 2011 and were completely finished in October 2011.

PROJECT INFORMATION:
  • Kitchen is a "U" shaped kitchen that is approximately 13' x 12'
  • We had a new dishwasher given to us from our Home Purchase Electrical Inspection (Budd Electric) when one of the workers accidently blew out the old dishwasher. They are a company in Corpus Christi of high integrity; thank you Budd Electric- you all are top rate!
  • We also had a fairly new refrigerator , so we didn't need to replace that either.
  • We did however, purchase a new double oven/stove with a matching mounted microwave (which is included in our budget). The oven/stove is in the "before" photos because the previous home owners took their old oven.
  • We took the room down to studs so we could add proper R-13 insulation.
  • All outdated electrical and plumbing was updated.
  • Wood Laminate Floors~ Lumber Liquidators
  • Solid Maple Cabinets~ Kitchenpro.com (RTA, dove tailed, anti slam drawer feature, euro hinges, raised panel)
  • Granite Counter Tops~ Corpus Christi Solid Surfaces
  • Tumbled Travertine Backsplash~ DIY by Teri
BUDGET= $10,000.
ACTUAL= $10,037. (OVER by just $37.)
Our "sweat equity" value on this project had we hired everything out ... ??? We can only guess!

Since we have so many photos of this project,
I selected some of the highlights in this video.


Friday, February 17, 2012

Living Room Remodel
AFTER PHOTOS~ (finally!)

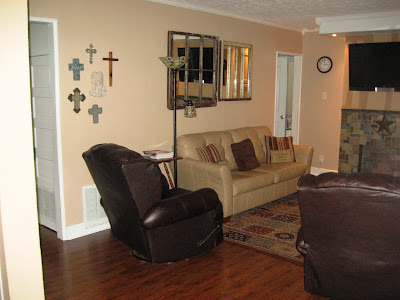
We started this remodel quite some time ago, like over a year ago (November 2010)! We finished the remodel in April 2011. We have been very slow on getting our "after" photos posted since as soon as we finished this project we were immediately starting another room- our dining room and kitchen areas.

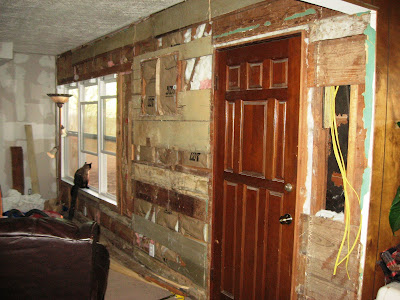
Just to re-cap the "Living Room Renovation" , as with every room in our fixer upper house, the renovation ended up being a much bigger project than we expected. We knew we would have to take the exterior facing walls down to the studs for the fact alone that this house has NO INSULATION and we want each room insulated. So as we took the drywall off the walls facing the outside, we discovered we got to 1/2 inch salvaged boards nailed to the studs under the drywall instead of exposed studs under drywall like in newer construction. This is a good and bad situation. Good that the boards add to a stronger structure, bad, that it's more time and challenge to get the walls insulated.

We took random boards off (numbering where they went) and got fresh insulation in, then replaced the boards. (this photo below shows before we replaced the random boards- you can see the insulation behind the boards)


Another time consuming project was getting all the electrical updated. We changed out all the old wiring in the walls, added several new outlets, and added recessed lighting in several places since there was no overhead lighting in the living room what so ever; a common situation in older home living rooms.

Dimmable recessed lighting
(both above TV cabinets and two separate pot lights)


The fireplace took a chunk of time as it was a major fire hazard and had to be eliminated completely! We considered replacing the old firebox that was broken in three places, but decided it wasn't worth the monetary investment especially since we live in south Texas and only have a week or two worth of winter that we would use the fire place. We decided to reconstruct the space for the "look" of a fireplace, but instead, make it a "candle place" that also has an electrical outlet for lighting and abundant storage (in cabinets) on each side.

This is after the demo.
Notice the burn spots on the wall?
YES... a fire waiting to happen!

PROJECT INFORMATION:
This Living Room is 11'2" wide x 17' long.
We budgeted $1,000. for this update.
We actually spent $2,413. (OVER budget by $1,413) Amazing how things add up!


BEFORE

AFTER


BEFORE

AFTER
AFTER


BEFORE
This original hearth was out of proportion for the space, blocking the door and making it awkward to walk by! A number of ceramic tiles were missing.

AFTER
Storage cabinet (18" wide x 24" deep x 80" tall)
(unfinished oak from Home Depot that we painted)
We used two cabinets total, placed back to back,
one on each side of the "candle place".

Dimmable recessed lighting, two lights on each side.
Wonderful storage for photo albums and crafts.
The other side houses our DVD's, CD's, video games and misc. electronics items.


BEFORE
AFTER
The multi-colored slate and two cabinets are part of what put our budget over, but well worth it!

The mood of a fire (year around) without the heat or fire hazard.

Flicker Electrical Lights~ I simply plug in a discrete outlet and enjoy.

See THIS POST for more "In Progress" photos of early stages of this remodel or THIS POST for a few photos of us laying the laminate floor.